


Examination of the Gastrointestinal System – detailed
Gastrointestinal examination and questions for doctors, medical student exams, finals, OSCEs and MRCP PACES
Introduction (WIIPPPE)
- Wash your hands (ensure that your hands are clean and warm with short nails)
- Introduce yourself
- Identity of patient – confirm name and date of birth
- Permission (consent and explain examination: “I’m going to examine your stomach and look for other signs of abdominal problems, is that OK?”)
- Pain?
- Position
- Initially at 45⁰ for comfort, but must be lying flat to palpate abdomen. A pillow under the head or raising knees slightly might help this.
- Expose fully (nipples to knees). Important to see hernial orifices.
- If this is inappropriate (e.g. in many exam situations) tell the examiner the amount of exposure you would ideally like but say you will not expose fully to maintain dignity.
General Inspection
- Begin the examination at the end of the bed with an inspection of the patient’s general condition and their surroundings.
- Explain to the patient what you are doing to avoid embarrassment. Although each anatomical area will be examined in detail later in the examination it is important to note signs such as jaundice, pallor and
hepatic encephalopathy which may be detectable at this stage. - Note any medical equipment attached to the patient or in the bedspace:
- Monitoring
- Catheter +/- urometer (inspect for quantity and colour)
- Pulse oximeter
- Surgical drains
- Treatments
- Oxygen specs/mask (method of delivery, rate, SATs)
- NG tube, IV fluids/ antibiotics
- TPN lines
- Central lines
- PCA pump
- Ensure drinks
- Bottles of Creon
- Paraphernalia
- Food and drink
- Nil by mouth (NBM) signs
- Vomit bowels
- Monitoring
Hands
- Move to the right-hand side of the patient and examine the hands. Ask the patient to hold out their hands and hold them gently with yours
- Begin by inspecting the nails looking for:
- Finger clubbing
- Leukonychia (white nails): a sign of hypoalbuminaemia and may be due to chronic liver disease
- Koilonychia (spoon-shaped nails): caused by severe iron deficiency
- Supinate the patient’s hands to observe the palms:
- Pale palmar creases: may signify anaemia
- Palmar erythema (red palms): chronic liver disease, pregnancy, hyperthyroidism
- Dupuytren’s contracture (thickening of the palmar fascia especially of the little and ring fingers)
- The cause of Dupuytren’s contracture is unknown but it has multiple associations including alcoholism, smoking, epilepsy, diabetes, repeated trauma, and family history.

Dupytren’s contracture
Wrist
- Take the radial pulse.
- See Examination of the Cardiovascular System for the correct method.
- Ask the patient to hold their arms out in front of them, elbows extended, and wrists cocked back for a few seconds
- Look for a tremor which may be caused by alcohol withdrawal
- Maintaining this position, ask them to fully dorsiflex their wrists and hold that position for (ideally) thirty seconds whilst you observe. It is best to give these instructions whilst demonstrating the position at the same time.
- Look for asterixis (‘liver flap’): jerky flexion and extension movements of the wrist and small joints of the hands caused by the metabolic effects of liver dysfunction and hypercapnia
Video illustrating asterixis (flapping tremor)
Arms
- Measure or ask for the blood pressure
- Look signs of intravenous drug use (a risk factor for hepatitis)
- Examine for arterio-venous fistulae (indication of renal replacement therapy)
- If fistula is found, look at it (needle marks indicate it is still in use) palpate it (if hard it may be thrombosed so not working) and auscultate it (a thrum likely indicates still active)
Face
- Ask the patient to look straight ahead.
- Gently pull down the lower eyelid to look for conjunctival pallor which is a sign of anaemia.
- Whilst the sclera is still exposed and under ambient white or natural light, inspect the eyes for the yellow colour of jaundice
- This sign results from the conjunctiva, not in fact the sclera, being stained by bile pigment, nevertheless it is commonly referred to as scleral icterus
- In Wilson’s disease, an autonomic recessive copper storage disorder, you may see Kayser-Fleischer rings, where excess copper is deposited in Descemet’s membrane to form brownish-green rings at the periphery of the cornea. These rings are best viewed with a slit lamp
- Finally look for xanthelasma (yellow periorbital plaques due to lipid deposition, which may occur in chronic cholestasis)
- Whilst the sclera is still exposed and under ambient white or natural light, inspect the eyes for the yellow colour of jaundice
- Now ask the patient to open their mouth
- Check for angular cheilitis (also known as angular stomatitis – inflammatory lesions at the corners of the mouth that are associated with iron deficiency)
- Shine a torch inside checking for ulceration, which may be due to an underlying medical condition such as Crohn’s disease, coeliac disease or reactive arthritis
- Ask the patient to stick out their tongue; this may appear pale and smooth in atrophic glossitis caused by iron deficiency; or beefy, red and raw in folate and vitamin B12 deficiency
- You may also be able to detect alcohol or the distinctive sweet smell of fetor hepaticus on the patient’s breath.
- The latter is commonly found in ketosis or severe liver disease, and is caused by the accumulation of volatile aromatic substances in the body
Neck and Chest
- Stand behind the patient and palpate for lymphadenopathy in the neck and supraclavicular region (see the Examination of the Respiratory System for a detailed description of technique).
- If palpation from behind is not possible, or not convenient, then palpation from the front is acceptable.
- Try to elicit Troisier’s sign, the presence of a palpable metastatic scalene lymph node in the left supraclavicular fossa.
- The enlarged node itself is called Virchow’s node, and can be caused by any abdominal or breast cancer, but is classic of gastric cancer.
Video on how to examine the lymph nodes
Abdominal Examination
- General examination
- This is a good point to inspect the skin of the arms and trunk, especially the abdomen, for:
- Scratch marks (pruritis is a feature of cholestatic liver disease)
- Bruising (due to impaired clotting factor production in liver failure)S
- Spider naevi
- Spider naevi are telangiectatic lesions which fill from a central feeding vessel. Compression of the central arteriole makes the radiating ‘spider legs’ fade completely.
- More than five spider naevi are abnormal and may be caused by excess oestrogen as a result of reduced oestrogen metabolism in chronic liver disease
- In men, excess oestrogen can also produce gynaecomastia
Abdominal examination video
Inspection of the Abdomen
- Ensure that the patient is completely supine for this part of the examination. Inspect the abdomen for scars, stomas, striae, sinuses, and fistulae.
- Striae are irregular areas of skin (bands, stripes or lines) and may be caused by abnormal collagen formation (Cushing’s syndrome, Ehlers-Danlos syndrome) or rapid stretching of the skin (pregnancy, obesity).
- Sinuses and fistulae are abnormal connections to the skin surface, often resulting from a deep infection, or infection of a surgical tract e.g. following laparoscopic surgery.
- Stomas are important to identify.
- Pay particular attention to the site of the stoma, the contents of the stoma bag, and whether the stoma is spouted or flush with the skin.
- This may help you identify the type of stoma.
- If the abdomen looks distended, ask the patient if this is normal for them.
- The umbilicus is a useful clue as it is usually sunken in obesity, and flat or everted in other conditions such as ascites. Decide whether the distension is generalised or caused by a localised mass.
- Ask the patient to look to the side and cough. Then ask them to raise their head up from the bed by just a few degrees and hold that position for a few seconds before relaxing back into the supine position.
- A patient with peritonism will find these movements very difficult due to severe pain and the rise in intra-abdominal pressure may accentuate or reveal abdominal wall hernias.
- Abdominal wall hernias include umbilical, incisional and spigelian hernias. Examination of inguinal and femoral hernias is beyond the remit of this page.
- Umbilical hernias resulting from incomplete closure of the abdominal wall during foetal development and are often noted at birth as a protrusion at the umbilicus. Umbilical hernias may also appear later in life, particularly after pregnancy, because this region is an area of weakness in the abdominal wall.
- Incisional hernias, meanwhile, result from abdominal surgery that causes a defect in the abdominal wall.
- Spigelian hernias are a rare type of hernia that occurs parallel to the midline of the abdomen, along the edge of the rectus abdominus muscle through the spigelian fascia.
- Dilated surface veins on the abdominal wall indicate portal hypertension or vena caval obstruction.
- ‘Caput medusa’ is the name given to distended veins flowing away from the umbilicus. Such signs of collateral circulation have more than 90% specificity for detecting cirrhosis, but are not sensitive.
- Peristaltic bowel movements may occasionally be visible if there is bowel obstruction.
Palpation
- Before palpating the abdomen ensure the patient is in the optimal position with their head relaxed on the couch and the the arms relaxed alongside the body. This ensures that the abdominal wall muscles are relaxed and not tense. Placing a pillow underneath the patient’s knees may also help, although this slightly reduces access to the abdomen.
- Ideally you should sit or kneel to the right of the patient at the same level as the patient. Whilst palpating, your hand and forearm should be in the same horizontal plane as the front of the patient’s abdomen. The aim of palpation is to detect tenderness, masses and organomegaly
- Before beginning, ask the patient if they have any pain, and if so ask him/her to point to where the pain is maximal
- Palpate gently but deliberately and ask him/her to report any tenderness as you go – avoid jerky or rapid movements
- In the presence of pain, start as far away as possible from its maximal site, then move systematically through the nine regions of the abdomen lightly palpating each one in turn to a depth of approximately one centimetre until you reach the site of maximal pain
- If the patient has no pain then simply choose an arbitrary starting point and palpate in a logical sequence.
- Always remember to watch the patient’s face for discomfort
- Once the entire abdomen has been palpated superficially repeat the palpation using deeper movements, feeling specifically for masses and organomegaly (splenomegaly or hepatomegaly)
- Tenderness is an important sign and maybe associated with guarding. Try to distinguish between voluntary guarding (conscious contraction of the abdominal musculature in apprehensive patients anticipating a potentially painful clinical examination) and involuntary guarding (localized peritoneal inflammation causing reflex contraction of overlying abdominal muscles upon palpation).
- Differentiating between voluntary and involuntary guarding can be achieved by engaging the patient in conversation to divert their attention whilst palpating, which would reduce voluntary but not involuntary guarding.
- Generalised peritonitis – inflammation of the whole peritoneal cavity – causes widespread tenderness elicited by minimal pressure. The abdominal wall muscles are held rigid (‘board-like’) and breathing becomes increasingly thoracic.
- Rebound tenderness is said to be present when the sudden withdrawal of manual pressure causes more pain than its application. This is a specific sign of peritonism.
- The presence of rebound tenderness can be tested by gently pressing the hand quite deeply against the abdomen, holding it for a few seconds, then rapidly removing it; however, light percussion (looking for ‘percussion tenderness) may cause less distress to the patient in these circumstances.
- Rebound tenderness is classically seen in acute abdominal pathology such as appendicitis, so may not be an appropriate test in all patients.
- If a mass is detected it should be assessed for the characteristics.
- To distinguish between a deep and superficial mass, ask the patient to tense their abdominal muscles by raising their head off the bed. If the mass is within the abdominal wall it will still be palpable whereas a deeper mass will not.
Palpating for the Liver and Gallbladder
Liver
- Palpate for the lower border of the liver which should be impalpable if it is normal sized.
- Begin by placing your right hand parallel to the right costal margin, in the right iliac fossa or at the level of the umbilicus (both of these methods allow for detection of a massively enlarged liver).
- Press into the abdomen with the radial border of the right hand, keep it stationary and ask the patient to take a deep breath in. The lower edge of a grossly enlarged liver will move downwards on inspiration and ‘bump’ against the radial side of your index finger.
- If nothing abnormal is felt, move your hand upward towards the costal margin by a few centimetres at a time, repeating the process until the costal margin or the liver edge is reached.
- If the liver edge is detected, describe size, surface, edge, consistency, tenderness, and pulsatility. See causes of hepatomegaly, and evaluation of the clinical utility of palpating the liver.
Video on how to palpate and percuss the liver
Gallbladder
- The gallbladder sits just below the liver and is not normally palpable. However, it may be palpable below the right costal margin if swollen due to obstruction of the cystic duct or common bile duct.
- Orient your right hand perpendicular to the costal margin and palpate from medial to lateral below the right costal margin, feeling for a bulbous, focal, rounded mass which moves downwards on inspiration.
- If an enlarged, non-tender gall bladder is associated with jaundice, Courvoisier’s Law states that the underlying pathology is unlikely to be due to gallstones (as the gallbladder classically becomes chronically fibrosed and thus incapable of enlargement) and is more likely to be secondary to carcinoma of the pancreas or distal cholangiocarcinoma. However, warn that the occurrence of Courvoisier’s sign in biliary conditions other than obstructive malignancies has been reported.

Abdominal anatomy. (A) Liver (B) Gallbladder (C) Ascending colon (D) Spleen (E)
Stomach (F) Transverse colon
- Now look for Murphy’s sign of acute cholecystitis.
- Ask the patient to breathe out, then gently palpate the right subcostal region.
- With your hand still in place, instruct the patient to take a deep breath in. This pushes the abdominal contents down as the diaphragm contracts, causing the gallbladder to descend toward the examiner’s hand.
- When this manoeuvre elicits a painful response from the patient, it is considered a positive Murphy’s sign, provided that the same test repeated on the left side is negative.
- The painful response is characterised by a sudden cessation of inspiration when the gallbladder reaches the examining fingers, and this is termed ‘inspiratory arrest’.
Video on Murphy’s sign
Palpating for the Spleen
The normal adult spleen lies immediately under the diaphragm in the left upper quadrant of the abdomen. It is not normally palpable, and can only be felt once it has increased in size threefold.
- Since the spleen enlarges from under the left costal margin down and medially towards the right iliac fossa, again use your right hand to start palpation in the right iliac fossa.
- Palpate downwards and cephalad, ask the patient to breathe in deeply as before, and try to detect the spleen edge moving downwards against your fingertips. Release, then move your hand diagonally upwards towards the left costal margin, repeating the same procedure inch by inch until the left costal margin is reached.
- Feel along the left costal margin, as the position of the spleen tip is variable.
- A palpable splenic edge always indicates splenomegaly, and a characteristic notch may be felt midway along its leading edge that helps in differentiating the spleen from the kidney. See causes of splenomegaly, evaluation of clinical utility of palpating the spleen.
Palpating for the Kidneys
The kidneys lie retroperitoneally in the paravertebral gutter of the abdominal cavity.
- To palpate the patient’s right kidney, place your left hand behind the patient’s right loin between the twelfth rib and the iliac crest. Then place your right hand on the right side of the abdomen just below the level of the anterior superior iliac spine.
- Palpate the loin between your hands as the patient breathes in and out; if the kidney is easy to feel it is either enlarged or abnormally low, as normal kidneys are usually impalpable except in very thin patients. This technique is called balloting.
- To feel the left kidney, lean across the patient and place your left hand around the flank into the left loin, then place your right hand on the abdomen and try to palpate the kidney between both hands.
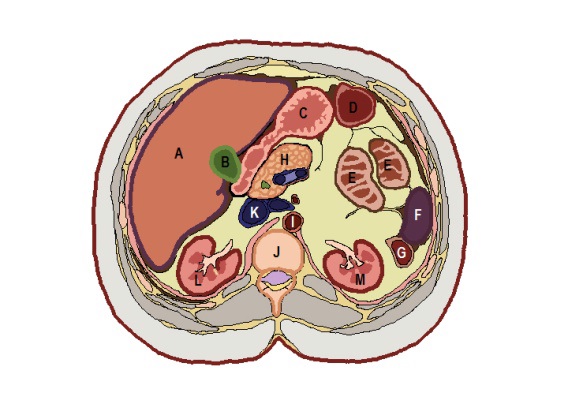
Abdominal anatomy. Transverse section at L1 level: (A) Liver (B) Gallbladder (C)
Stomach (D) Transverse colon (E) Jejunum (F) Spleen (G) Left colic (splenic) flexure (H) Neck of
pancreas (I) Abdominal aorta (J) L1 vertebral body (K) Inferior vena cava (L) Right kidney (M)
Left kidney
Video on how to ballot the kidneys
Palpating for the Aorta
The aortic pulse is palpable in thin individuals, but is usually impalpable in muscular or obese patients. Palpation of the aorta is primarily to detect an abdominal aortic aneurysm (AAA) which may be asymptomatic but rupture of which can have a very high mortality.
- Ensuring that the patient’s abdominal muscles are relaxed, place both hands flat above the umbilicus.
- Position yourself so that the fingers of each hand point toward the epigastrium and the ulnar borders of each hand run alongside the patient’s left and right costal margins respectively.
- Include a generous amount of abdominal skin between the index fingers and, if you find it easier, probe for one side of the aorta at a time.
- The aorta may be felt as a pulsatile mass which characteristically exhibits lateral as well as vertical expansion.
- It may be possible to palpate a non-aneurysmal aorta in slim patients, and this should not be confused with an aneurysm.
- Indeed, it is the width and not the presence or intensity of the pulsation that suggests the diagnosis of an AAA; aortas estimated to be wider than 2.5 cm warrant further investigation, usually ultrasound.
- Note that even grossly enlarged aneurysms may not be palpable due to body habitus; in this situation the absence of a palpable aneurysm does not rule out an AAA and therefore further investigation may be necessary. See evaluation of the clinical utility of palpating for a non-ruptured abdominal aortic aneurysm.

The examiner uses both hands, parallel to the costal margins (certainly always above the umbilicus), to palpate for the aorta
Percussion
Routine examination of the abdomen should include percussion. The whole abdomen should be percussed to demonstrate the presence of bowel gas (resonant) and solid or fluid-filled structures (dull). Percussion can also be used to map out a tender area identified during palpation. To gain maximum information from percussion, a good technique is important.
- Use your nondominant hand as a base; most frequently, the dorsal aspect of the middle third phalanx is struck. This finger should be firmly placed on the skin, away from bony prominences.
- Use the middle finger of your free hand to deliver a series of two blows in each position, with equal force.
- Blows must be delivered by bending the wrist only.
Video demonstrating percussion technique
- Confirm your findings from palpation by percussion.
- In particular for the liver, remember that a palpable liver edge does not always signify an enlarged liver.
- Percussion is performed to estimate liver margins and therefore to determine liver size.
- Percussion should be performed first at the right midclavicular line, and subsequently at the midsternal and anterior axillary lines.
- To locate the upper border, percuss from above the right nipple down towards the right costal margin.
- To locate the lower border, percuss from a level below the umbilicus up towards the right costal margin,
- The upper border is percussed using heavy percussion to eliminate the resonant quality produced by overlying segment of lung, whilst the lower border is percussed using light percussion to ensure inferior extent is not underestimated due to the liver’s close apposition to the anterior abdominal wall.
- The normal upper border of the liver should be in the fifth intercostal space, whilst that of the lower border is at the right costal margin.
- Non-hepatomegaly causes of a palpable liver edge may be detected upon percussion at the upper border of the liver, and include hyperinflated lung pushing the liver down (emphysema or asthma), or interposition of the transverse colon between the liver and the diaphragm.
- Other examples of a palpable liver edge not resulting from hepatomegaly are the presence of a palpable caudate or Riedel’s lobe or a thin body habitus with a narrow thoracic cage.
- To percuss for the spleen, begin percussion in the right iliac fossa and proceed diagonally in a straight line toward the left costal margin. Remember that retroperitoneal structures and masses are resonant to percussion due to overlying bowel; thus, an enlarged kidney will be resonant to percussion, whereas an enlarged spleen will not.
- Note that, whereas some clinicians prefer to palpate the whole abdomen before percussing, Browse advises that each organ should be assessed with both palpation and percussion before moving onto the next organ. Both methods are perfectly acceptable.
- A dull area may also draw attention to a mass missed upon palpation. Check any circumscribed mass for a fluid thrill by placing a hand on both sides of the mass, then quickly flexing the metacarpophlanageal joints of one hand, whilst feeling for a vibration or ‘thrill’ on the other side with the other hand.
Examining for Ascites
Now try to ascertain whether the patient has ascites (free fluid in the abdominal cavity). Bear in mind that in most cases, ascites is associated with abdominal distension which you may already have detected on inspection.
- Percuss from the midline away from you to the flank furthest away, noting any change from resonant to dull. If no such change is present, move on to examine for a succussion splash (below).
- If a change from resonant to dull is heard upon percussion, examine for shifting dullness in the following manner. Keep your finger on the site of dullness in the flank and ask the patient to roll towards you onto their side.
- Wait at least 10 seconds to allow any free fluid to move under the influence of gravity, then percuss again continuing to move in the same direction.
- If the area is now resonant, you have demonstrated ‘shifting dullness’ as the ascitic fluid became dependent. McLeod and Browse both suggest an alternative method of testing for ‘shifting dullness’, but this involves marking the patient’s abdomen with a pen and would not be expected in an OSCE scenario.
- According to the data from several studies pooled by Swartz, shifting dullness is the most sensitive sign for ascites (83-88%); specificity is 56%. Obvious ascites may also produce a generalised fluid thrill.
- This can be elicited by flicking a finger of your right hand against the right side of the abdomen, whilst feeling for a ripple against the left palm on the other side.
- Before doing so you must ask the patient (or an assistant) to place the ulnar edge of their hand vertically at the umbilicus to prevent transmission of the impulse through the abdominal wall fat and skin. Swartz found that presence of a prominent fluid wave was the most specific sign (82-92% specificity) for ascites. Ascites has been found to have a specificity of over 90% for detecting cirrhosis.
Video demonstrating how to examine for shifting dullness (sign of ascites)
Succussion Splash
Lastly, if you suspect gastric outflow obstruction you can try holding the patient at the hips and shaking the abdomen from side to side.
- Audible splashing sounds, a succussion splash, usually indicate that the stomach is distended with a mixture of fluid and gas.
- A succussion splash more than 4 hours after eating or drinking is said to indicate delayed gastric emptying as seen in pyloric stenosis.
- This manoeuvre can be uncomfortable for the patient, however, and should only be performed when there is clinical suspicion of delayed gastric emptying.
Auscultation
Auscultation for Bowel Sounds
- First place the diaphragm of the stethoscope to the right of the umbilicus and listen for bowel sounds. If no sounds are heard, ausculatate all four quadrants to make sure no sounds are missed and to localise specific sounds.
- Normal bowel sounds are low-pitched gurgles occurring every 5-10 seconds, although frequency varies widely. Only conclude that they are absent after listening for 2 minutes (some clinicians contend that 5 minutes of continuous listening is required).
- Absence of bowel sounds indicates that peristalsis has ceased, implying paralytic ileus or peritonitis.
- Mechanical intestinal obstruction increases the volume and frequency of bowel sounds, which are often described as having a high-pitched, tinkling quality.
Auscultation for Bruits
A bruit is an abnormal blowing or swishing sound resulting from blood flowing through a narrow or partially occluded artery.
- Place the diaphragm above the umbilicus to listen for an aortic bruit. Then place the diaphragm 2-3 cm above and lateral to the umbilicus to listen for renal artery bruits.
- You may also listen over the liver for bruits occurring in hepatoma or acute alcoholic hepatitis, or for friction rubs caused by inflammation of the peritoneal surface of organs by tumour, infection or infarct.
Hernias
- In any abdominal examination it is important to assess for groin hernias. This will be discussed in on a separate page.
External Genitalia and Digital Rectal Exam
- It may be appropriate at this point to examine the external genitalia but this is a test usually offered at the end of the examination. Digital rectal examination may also be indicated.
Completing the examination
- Thank the patient, help them back into comfortable posture and wash your hands.
- Give the patient some privacy to redress.
- In an OSCE you should finish by addressing the examiner, stethoscope behind your back, not looking back at the patient and presenting your findings slowly and concisely. See here for a summary.
Questions about the abdominal examination
- What are the GI causes of clubbing?
- What are the different types of stoma? (ileostomy vs colonostomy)
- What are the causes of general abdominal distention?
- How to describe a mass or lump in a medical exam?
- What are the causes of hepatomegaly?
- What are the causes of splenomegaly?
Click here for medical student OSCE and PACES questions about Abdominal Examination
Common Abdominal Examination exam questions for medical students, finals, OSCEs and MRCP PACES