


Examination of the Respiratory System – detailed
Respiratory examination and questions for medical student exams, finals, OSCEs and MRCP PACES.
Introduction
- Start by washing your hands.
- Introduce yourself to the patient and obtain informed consent.
- Check the patient is not in any pain or discomfort and ensure he/she is positioned correctly, ideally with the chest fully exposed (this may cause embarrassment in female patients so one can try and access the auscultation points without full exposure but this may compromise the accuracy of the examination).
- The patient should be lying in bed with their upper body at 45 degrees and a pillow supporting the head.
General Inspection
- Begin the examination at the end of the bed with an inspection of the patient’s general condition and their surroundings.
- Explain to the patient what you are doing to avoid embarrassment. Although each anatomical area will be examined in detail later in the examination it is important to note signs such as dyspnoea, pallor or cyanosis which may be detectable at this stage.
- Note any medical equipment attached to the patient or in the bedspace
The Hands
Move to the right-hand side of the patient and examine the hands. Ask the patient to hold-out their hands and hold them gently with yours.
- Begin by looking at the fingers, especially the finger tips, and the nails.
- Examine for finger clubbing.
- Other signs in the hand may include: nail changes, tar staining indicative of recent smoking, wasting of the small muscles of the hand, especially at the thenar and hypothenar eminences, seen when apical lung tumours (Pancoast’s tumour) impinge on the C8/T1 nerve roots, and changes seen in rheumatoid arthritis which may be associated with bronchiectasis and pulmonary fibrosis.
- Peripheral cyanosis may also be detected in the hands giving a blue colour to the tissues caused by the presence of deoxygenated haemoglobin.
- Note that, in the absence of central cyanosis, this is reflective of peripheral vasoconstriction and stasis of blood in the peripheries. Central cyanosis is seen in the tongue and lips due to desaturation of central arterial blood.
Video on how to examine for finger clubbing
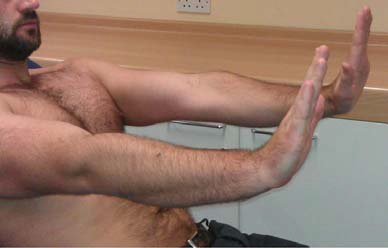
- Ask the patient to hold their arms out in front of them, elbows extended, for about ten seconds and assess if they have a tremor.
- Then, maintaining this position, ask them to fully dorsiflex their wrists and hold that position for about thirty seconds whilst you closely observe for asterixis. It is best to give these instructions whilst demonstrating the position at the same time.
- Asterixis is manifest by sudden loss of dorsiflexion causing flexion movements towards the neutral position at the wrist and may be a sign of carbon dioxide retention (‘carbon dioxide flap’) or hepatic encephalopathy (‘liver flap’).
Video on how to examine for asterixis
The Radial Pulse
- Palpate the right radial pulse by placing the tips of your index, middle and ring fingers over the radial artery, usually situated just medial to the radius.
- You should assess the rate, the rhythm and the character of the pulse.
- Establish the rate in beats per minute by counting the number of beats over a 15 second period and multiplying by four.
- The normal resting heart rate should be between 60 and 100 beats per minute.
- Then analyse the rhythm of the pulse and decide if it is regular, irregularly irregular, or regularly irregular.
- A regular pulse is at a constant frequency with a constant interval between the beats.
- If it is not of a constant frequency it is irregular.
- Irregular pulses are conventionally divided into ‘regularly irregular’ and ‘irregularly irregular’.
- A regular pulse is at a constant frequency with a constant interval between the beats.
- A regularly irregular pulse has a repeating pattern – for example two beats close together, then a gap and then another two beats close together.
- If there is no repeating pattern and the beats seem to arise randomly then the pulse is said to be irregularly irregular.
- A correlation of pulse character and underlying cardiac rhythm is beyond the scope of this article but one of the most common abnormalities of pulse rhythm is atrial fibrillation (AF) which gives an irregularly irregular pulse.
- The character of the radial pulse should also be assessed, although it is more accurate to do this in large volume central pulses such as the carotids.
- A ‘slow-rising’ pulse has a delayed up-stroke and occurs in aortic stenosis.
- A pulse is described as ‘bounding’ if it has an increased up-stroke and down-stroke. This may be a sign of CO2 retention.
- A ‘jerky’ pulse is characteristic of hypertrophic cardiomyopathy, but this is unlikely to be detected peripherally.
- Proceed to palpate both radial pulses simultaneously to detect any inequality in timing.
- This is known as radio-radial delay and is a sign of aortic coarctation.
- Check for inequality in the strength of the radial pulses.
- Strength inequality of arm pulses has been shown to be a highly sensitive sign in diagnosing aortic dissection.
- Examine for a collapsing pulse by placing your fingers across the anterior aspect of patient’s forearm and applying just enough pressure to occlude the radial pulse.
- Confirm that the patient has no pain in their shoulder, and then elevate their arm above their head whilst maintaining the position of your hand.
- You are feeling for a forceful knocking sensation that is typical of aortic regurgitation, commonly known as the ‘collapsing’ or ‘water-hammer’ pulse.
- Radio-femoral delay is the sign that is present if the femoral pulse comes after the radial pulse. The two pulses should occur at the same time and radiofemoral delay is a sign of coarctation of the aorta.
- The difficulty exposing the femoral artery means that this part of the examination is not included in routine cardiovascular examinations.
- In OSCEs you should simply indicate to the examiner that at this point you would like to palpate for radio-femoral delay. See Examination of the Peripheral Arterial System.
- Pulsus paradoxus
- Pulsus paradoxus is usually defined as an inspiratory decline in systolic BP that exceeds 10mmHg, but a more appropriate threshold may be 12mmHg which has been shown to be the upper 95% confidence interval for an inspiratory drop in normal individuals.
- It occurs in 98% of patients with cardiac tamponade and is a highly sensitive and specific sign in identifying the condition in those with known pericardial effusions.
- One should therefore always check for pulsus paradoxus in patients with suspected pericardial disease and you should indicate this to the examiner.
- To measure pulsus paradoxus, begin by measuring the BP as described but on hearing the first Korotkoff sound, prevent further deflation of the cuff. In patients with paradox, the sounds are intermittent with respiration. Note this pressure then continue to deflate the cuff until sounds are heard throughout the respiratory cycle. The amount of paradox in mmHg is the difference between the pressure at this point and the initial measurement.
- Pulsus paradoxus is usually defined as an inspiratory decline in systolic BP that exceeds 10mmHg, but a more appropriate threshold may be 12mmHg which has been shown to be the upper 95% confidence interval for an inspiratory drop in normal individuals.
Video on how to measure pulsus paradoxus
The Face
- Begin by looking at the eyes.
- Assess pupil size and symmetry.
- Look at the eyelids, the normal upper lid lies 1.5mm below the superior corneal limbus.
- Ptosis refers to drooping of the upper eyelid, this can be partial or complete.
- Enophthalmos is a sign which refers to posterior displacement of the eye, a difference of 2mm between the eyes is usually evident on examination.
- Look at the facial skin for rashes and anhydrosis (loss of sweating). Ask the patient to open their mouth and elevate their tongue to inspect the underside for marked blue discolouration indicating central cyanosis, reflecting inadequate blood oxygenation in the lungs or increased oxygen extraction in the tissues.
- A malar rash is a characteristic macular, non itchy rash in the shape of a butterfly over the bridge of the nose and across the cheeks. It is present in systemic lupus erythematosus which is associated with pulmonary fibrosis, pleural effusion and pulmonary emboli.
- Lupus pernio is a rash characterised by violaceous smooth shiny plaques on the face which is a sign of sarcoidosis which is associated with pulmonary fibrosis and bronchiectasis.
- Ptosis, miosis (small pupil), anhydrosis and apparent endophthalmos are seen in Horners Syndrome.
- Horner’s syndrome is caused by disruption of the sympathetic input to the face and can be caused by Pancoast’s tumour. This is an eponym for apical lung tumours which are prone to invading the cervical or thoracic sympathetic chain interrupting the supply to the neck, head and face.
The neck
The neck is a sensitive area and examination may be uncomfortable so it is important to inform the patient in advance.
- Start by examining the trachea for deviation and for tug.
- Placing your index and ring finger of the right hand on the head of each clavicle, use the middle finger of the same hand to palpate the trachea in the sternal notch.
- Roll you finger across the trachea in the axial (horizontal) plane to assess for deviation.
- The trachea is a midline structure and should lie equidistant between the clavicular heads.
- Next place your index finger of the right hand on the trachea against the inferior edge of the cricoid cartilage.
- Place subsequent fingers, in the sagittal (vertical) plane, below this into the sternal notch until the trachea is no longer palpable and the sternum is reached, this is referred to as the crico-sternal distance and is normally three finger widths (5cm) or above.
- Note whether the trachea moves inferiorly, reducing the crico-sternal distance on inspiration, referred to as tracheal tug.
- A reduction in the crico-sternal distance and tracheal tug signify marked chest hyperexpansion, usually secondary to airflow obstruction and are commonly seen in COPD.
Video on how to examine for tracheal deviation
- Examine for cervical lymphadenopathy from behind the patient if possible.
- Standing directly behind the patient place both hands under their chin to assess for cervical lymphadenopathy.
- Use the sensitive pulps of your fingers to simultaneously palpate the left and right; submental, submandibular, anterior and posterior cervical chains, supraclavicular, pre-auricular, post-auricular and occipital lymph nodes, in turn.
- Comparing with the contralateral side note the location, size and characteristics of any masses using the techniques described in The Journal of Clinical Examination: Examination of lumps and bumps.
- Next examine the JVP
- With the patient is lying at a 45 degree angle, ask them to turn their head slightly away from you whilst relaxing their head against a pillow.
- Observe along the surface of the neck rather than observing in a perpendicular orientation, as the movement is easier to discern in this plane, for the double pulsation of the jugular venous pressure (JVP) which originates between the two heads of the sternocleidomastoid muscle.
- If you are unsure, you can attempt to palpate the pulse, unlike the carotid pulse, it will be impalpable. Under normal conditions, the JVP should be less than 4cm above the sternal angle in the vertical plane.
- The JVP is an indirect measure of central venous pressure and can be raised secondary to right heart failure (cor pulmonale), which can exist secondary to a variety of chronic lung diseases, including COPD, fluid overload, increased intrathoracic pressure, cardiac tamponade or constrictive pericarditis.
- It may also occur in superior vena cava obstruction.
- Such obstruction can be caused by a bronchial carcinoma, especially of the right upper lobe.
- This leads to venous distension and oedema in the neck, face, upper chest and arms.
Video on how to examine for lymphadenopathy (very thoroughly!)
The Chest – Anterior
Palpate
- Examine expansion of the chest.
- Place your hands, palm down either side of the manubrium, with your thumbs equidistant from the midline and raised slightly with your fingers on the chest, wrapped around the thorax.
- Ask the patient to take deep breaths in and observe your hands simultaneously rising with each inspiration.
- Place your hands on the lower anterior thorax and using the same technique.
- Ask the patient to breathe out and then take a deep breath in.
- As the patient inspires, you should be able to measure the expansion of both sides of the chest by observing your thumb’s movements relative to the midline. This should normally be at least 5cm.
- Place you right hand against the thorax over the fifth intercostal space, mid-clavicular line to palpate for the cardiac apex beat.
- In female patients, it may be appropriate to lift the left breast using the back of your left hand to lift the breast from underneath whilst palpating with your right.
- Place the base of your right hand firmly against the chest to the left of the sternum at the level of the heart to palpate for the heart. If the heart beat is palpable this is referred to as a parasternal heave.
Video on how to measure chest expansion
- Whilst palpating the chest, be vigilant for a crackling sensation under your fingers, which may indicate subcutaneous emphysema.
- Reduced expansion may be secondary to fibrosis, consolidation, effusion, collapse or pneumothorax.
- The cardiac apex beat may not be palpable in obesity and severe lung hyperexpansion. It may be displaced from the fifth intercostal space, mid-clavicular line in pleural effusion, lobar collapse, pneumothorax or pneumonectomy.

Palpating for a parasternal heave
- A parasternal heave is suggestive of right ventricular hypertrophy which may exist secondary to pulmonary hypertension in chronic obstructive pulmonary disease, interstitial lung disease or multiple pulmonary emboli.
Inspect
- Inspect the chest from the front and the side. You should have already briefly inspected the chest at the beginning of the examination but at this stage take some time to inspect more closely.
- Do not neglect the lateral aspect of the chest and axillae which may only be visible by asking the patient to move their arms. Any sign is potentially relevant and it is not possible to provide a full list here but the most important signs and their significance are described below.
- The most important things are to note the shape of the chest, the respiratory rate the character of the movement.
- An increased anteroposterior diameter describes a ‘barrel shaped’ chest, seen in patients with severe airflow obstruction (such as chronic obstructive pulmonary disease or severe asthma).
- This is often coupled with a dorsal kyphosis and prominence of the sternum.
- In contrast, a pectus carinatum (‘pigeon-shaped’ chest) results from localised deformity of the sternum and costal cartilage, which bulge outwards. This can exist secondary to chronic respiratory disease in childhood.
- Pectus excavatum (‘funnel-shaped’ chest) is a developmental defect which can arise due to connective tissue disease. It results in a localised depression of the inferior part of the sternum.
- Spinal deformity, kyphosis or lordosis, may impinge on respiration and may be associate with systemic disease such as ankylosing spondylitis, which can lead to apical lung fibrosis.
- Thoracotomy scars and those from breast surgery (which could suggest malignant pleural effusion) may be obvious but it is important to pay close attention to the skin as more subtle scars for example from previous chest drain insertion could give significant clues to underlying pathology yet may not be seen even on close inspection.
- Radiotherapy tattoos, suggesting the presence of malignancy, may be associated with well demarcated inflammation of the skin in the acute stage, or pulmonary fibrosis, potentially detectable on auscultation in the longer term.
Percuss
- Percuss the thorax by placing the middle finger of the left hand firmly against the chest wall. Use the tip of the distal phalynx of the right middle finger to strike the middle phalanx of the left middle finger.
- The striking motion should be firm and brisk. If you are left-handed you may prefer to reverse the roles of the left and right hands but the ergonomics of examining from the right mean that the method described above is ideal if possible.
- The striking action should generate a ‘percussion note’ which on a normal chest is said to be resonant.
- Abnormal percussion notes are classified as either dull or hyper-resonant.
- Begin by percussing over the apex of the lung. This can be achieved either by percussing in the supraclavicular fossa or by percussing the clavicle.
- It is not necessary to percuss both. If percussing in the supraclavicular fossa it may be easier to apply the thumb to the chest wall rather than the finger.
- The clavicle should be percussed directly with the middle finger of the right hand – there is no need to apply a finger to the chest wall at this site.
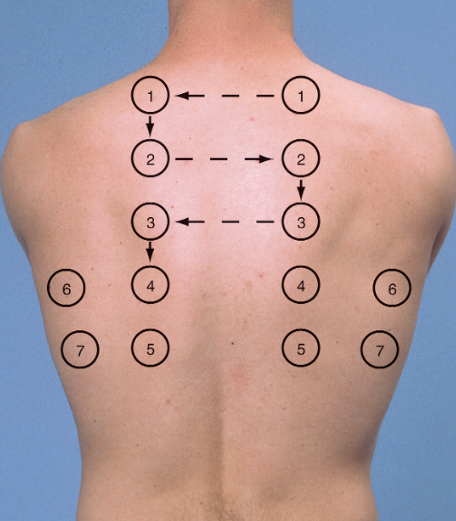
Suggested sites for percussion and auscultation of the chest posteriorly (1-5) and and laterally (6 and 7). Anteriorly, three places in the mid axillary line on either side (as well as each apex – percuss the clavicle) is sufficient.
- Next percuss the anterior aspect chest wall followed by the lateral aspect of the chest wall.
- The percussion sites will depend on the clinical context but in a routine examination there is no agreement on the number and distribution of percussion sites that should be chosen.
- The conventional method is to choose three points on the anterior chest wall close to the midclavicular line and two points on the lateral chest wall close to the midaxillary line– this allows a thorough assessment of each of the lobes of each lung.
- The exact site of percussion is not crucial but it is important to percuss the same site in each hemithorax one after the other to allow comparison.
Auscultate
- Using the bell of the stethoscope auscultate the supraclavicular fossae in turn with the patient taking normal breaths through an open mouth.
- Next using the diaphragm auscultate the anterior and lateral chest in the same distribution as described for percussion comparing each hemithorax in turn.
- In thin patients with prominent ribs the bell may need to be used to ensure good skin contact. Pay particular attention when auscultating the right axilla, right middle lobe pathology may only be demonstrated here.
- Repeat auscultation over the same areas, comparing each hemithorax in turn, whilst asking the patient to say ‘ninety-nine’ each time the stethoscope touches their chest to assess for vocal resonance.
- If consolidation is suspected, see below, auscultation can be further repeated with the patient whispering ninety-nine’ to assess for ‘whispering pectoriloquy’.
- Alternately instruct the patient to say the letter ‘E’ or the word ‘bee’ each time you auscultate as above to test for aegophony. If it is present you will hear ‘A’ (as in ate) rather than ‘E’, again suggesting consolidation. Be sure to remove your stethoscope for a second to verify the patient is still saying ‘E’!
- Whilst auscultating, listen for the quality of the breath sounds, the loudness of these sounds and note any added sounds.
- Vocal resonance tests the lung’s ability to transmit sound. In an area of consolidation, the patient’s voice becomes clearer, whilst if there is a pleural effusion, the sound will be damped and the patient’s voice becomes further muffled.
- If vocal resonance is increased to the point where a whisper can be heard clearly this is termed ‘whispering pectoriloquy.’
- Aegophony is another test for areas of consolidation. This phenomenon was originally described by Laennec, the term aegophony is thought to mean ‘goat sound,’ named as such because the sound heard was said by Laennec to be ‘quavering and jerky, like the bleating of a goat.’ Alongside whispering pectoriloquy, aegophony is a sensitive physical finding for consolidation.
Chest – Posterior
- Ask the patient to lean forwards.
- The arms should be crossed to abduct the lower pole of the scapulae.
- Inspect, palpate, percuss and auscultate the posterior chest as described above, repeat in four to five parallel locations; ensuring that you are auscultating down to the level of the 10th rib.
- Expose the lower limbs to the mid thigh. Inspect specifically looking for oedema and rashes.
- Palpate the legs to assess for calf tenderness and for the presence of pitting oedema by applying pressure over a bony prominence for ten seconds to see if pitting is observed.
- The level to which pitting oedema extends should be noted, and sacrum should also be examined for this phenomenon.
- Peripheral oedema may represent congestive cardiac failure or cor pulmonale secondary to pulmonary disease.
- A deep venous thrombosis may present with lower limb swelling or erythema.
- Erythema nodosum, a panniculitis which causes tender nodules; often on the shins may be observed.
- Erythema nodosum may be seen in respiratory disease such as streptococcal infection, tuberculosis and sarcoidosis.
Examining for peripheral pitting oedema
Auscultating the Heart
- A full examination of the cardiovascular examination is beyond the scope of this article but some cardiovascular signs are of direct relevance to the examination of the respiratory system and should be specifically sought-out. For a full account of how to perform the cardiovascular examination please see The Journal of Clinical Examination’s: Examination of the Cardiovascular System.
- Ascultate the left lower sternal edge for a pan systolic murmur loudest during inspiration as this is classically of tricuspid regurgitation, which can be secondary to right ventricle dilatation seen with pulmonary hypertension.
- Aucsultate the left upper sternal edge for a high pitched early diastolic murmur loudest during inspiration, a Graham Steell murmur, caused by high velocity regurgitant flow across the pulmonary valve typical of pulmonary hypertension.
- Note the components of the heart sounds and listen for a right ventricular S4, giving a gallop rhythm.
- Note the cadence of the 3 heart sounds – S1, S2 and S4 which are said to resemble that of the word ‘Tennessee’ which are seen in pulmonary stenosis or pulmonary hypertension.
- Finally, note the volume of the components of the heart sounds for a loud P2 which will be evident in pulmonary hypertension.
Completing the examination
- Thank the patient, help them back into comfortable posture and wash your hands.
- Give the patient some privacy to redress.
- In an OSCE you should finish by addressing the examiner, stethoscope behind your back, not looking back at the patient. See here for a summary.
- To complete the examination you should perform pulse oximetry to measure oxygen saturations and measure the temperature. If obstructive airways disease is suspected then you should measure peak expiratory flow using a peak flow meter.
Questions about the respiratory exam
- What are the categories of lung disease?
- What are the causes of tachypnoea and bradypnoea?
- What are possible nail findings in lung disease?
- What are the causes of tracheal deviation?
- What are the types of percussion notes?
- What is the significance of different sputum types?
- What is the significance of different cough types?
- What are the types of abnormal breath sounds?
Click here for medical student OSCE and PACES questions about Examination of the Respiratory System
Common Examination of the Respiratory System exam questions for medical students, finals, OSCEs and MRCP PACES